Scene table and scene properties
Values in the Scenes table
The Scenes table displays both default and customized settings for scenes. The scenes table works the same way on both Casambi Pro for Windows and Casambi Pro for iOS.
- Windows
- iPad
Windows
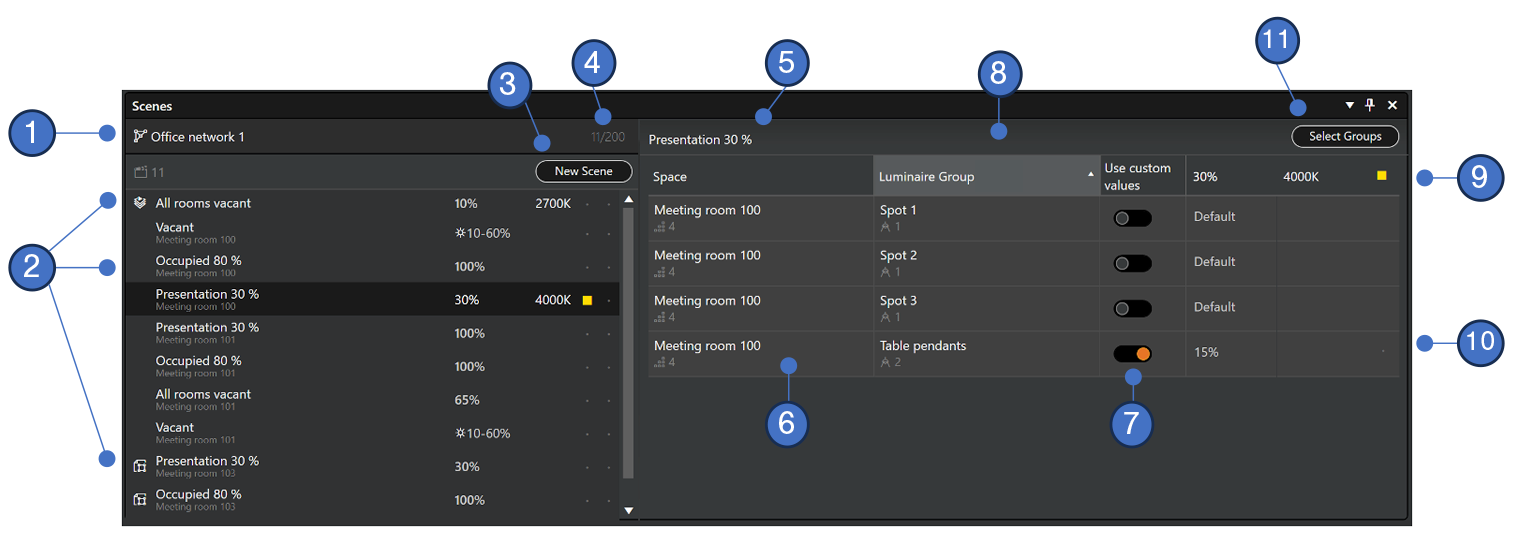
- Current selection: The header displays the currently selected Network or Space.
- Scenes List:
- Context: List of items depends on the currently selected network or space.
- If a space is selected, the list only displays scenes where at least one luminaire group from that space participates.
- If a network is selected, the list displays all scenes in that network.
- Scene rows:
- Each scene row shows the scene name and the default lighting parameters set to it. Additionally, if scene's scope is only one space, the space's name is shown below the scene name.
- If a scene contains luminaire groups from more than one space, the network level scene icon (
 ) is displayed.
 - If a scene belongs to a space which is linked to a space template, the space template scene icon (
 ) is displayed. Note, that the scenes derived from a space template can only be edited in Casambi Pro for Windows, in the space template editor.
- Selection: Click a scene name to select it from the list to see its details on the right.
- Context: List of items depends on the currently selected network or space.
- New Scene Button: Clicking this button opens a dialog where you can enter a name and default dimming value to the new scene, and select which luminaire groups will be participating to that scene.
- Scene count: Number of scenes in the currently selected network. The maximum number of scenes in one network is 200.
- Name of the currently selected scene This name field is interactive, clicking it will show scene's default properties in the Property Pane.
- Luminaire groups list: The participating luminaire groups in the currently selected scene are listed here in table of six columns:
- Column 1: Name of the parent space where the group is located, and total number of groups in that space
- Column 2: Name of the luminaire group and the number of paired luminaires in the group
- Column 3: Use of custom values: toggle
- Column 4: Luminaire Dimming value in percentages. If the scene is controlled by a circadian profile or by daylight sensor, a related icon is displayed.
- Column 5:
- Column 6:
- Use custom values toggle
- If switch is off: Scene's default values are applied to this luminaire group
- If switch is on: Default scene values are replaced with custom parameters set in the property pane. These values will be applied to only this group. This same toggle option is available in the Property Pane.
- Luminaire Group Table (Right):
- When a scene is selected, this table displays the participating luminaire groups and their specific configuration.
- The rows show participating luminaire groups, their parent spaces, and specific behaviour.
- Click a row to edit that group’s local behavior in the Properties pane.
- Layout Identification: When a scene is selected, all participating luminaire groups are highlighted in green on the floor plan layout.
- Property Pane - Header displays general information for the scene or luminaire group selected from the Scenes pane.
- If the entire scene is selected, the properties pane shows the default values for the entire scene.
- If a single luminaire group row is selected, the properties pane shows the used values for that group.
- Navigation Tabs: The Main, Other, Links, and Notes tabs display the parameters for the item selected in the Scenes table.
- Context Label: The top of the Main tab explicitly states the selection context (e.g., "Default values for...") to prevent editing errors.
- Parameter Adjustment: Adjustable parameters such as dimming levels, color temperature, and RGB values are modified here.
- Group Management: Click the Select Groups button to add or remove luminaire groups to or from the currently focused scene.
iPad
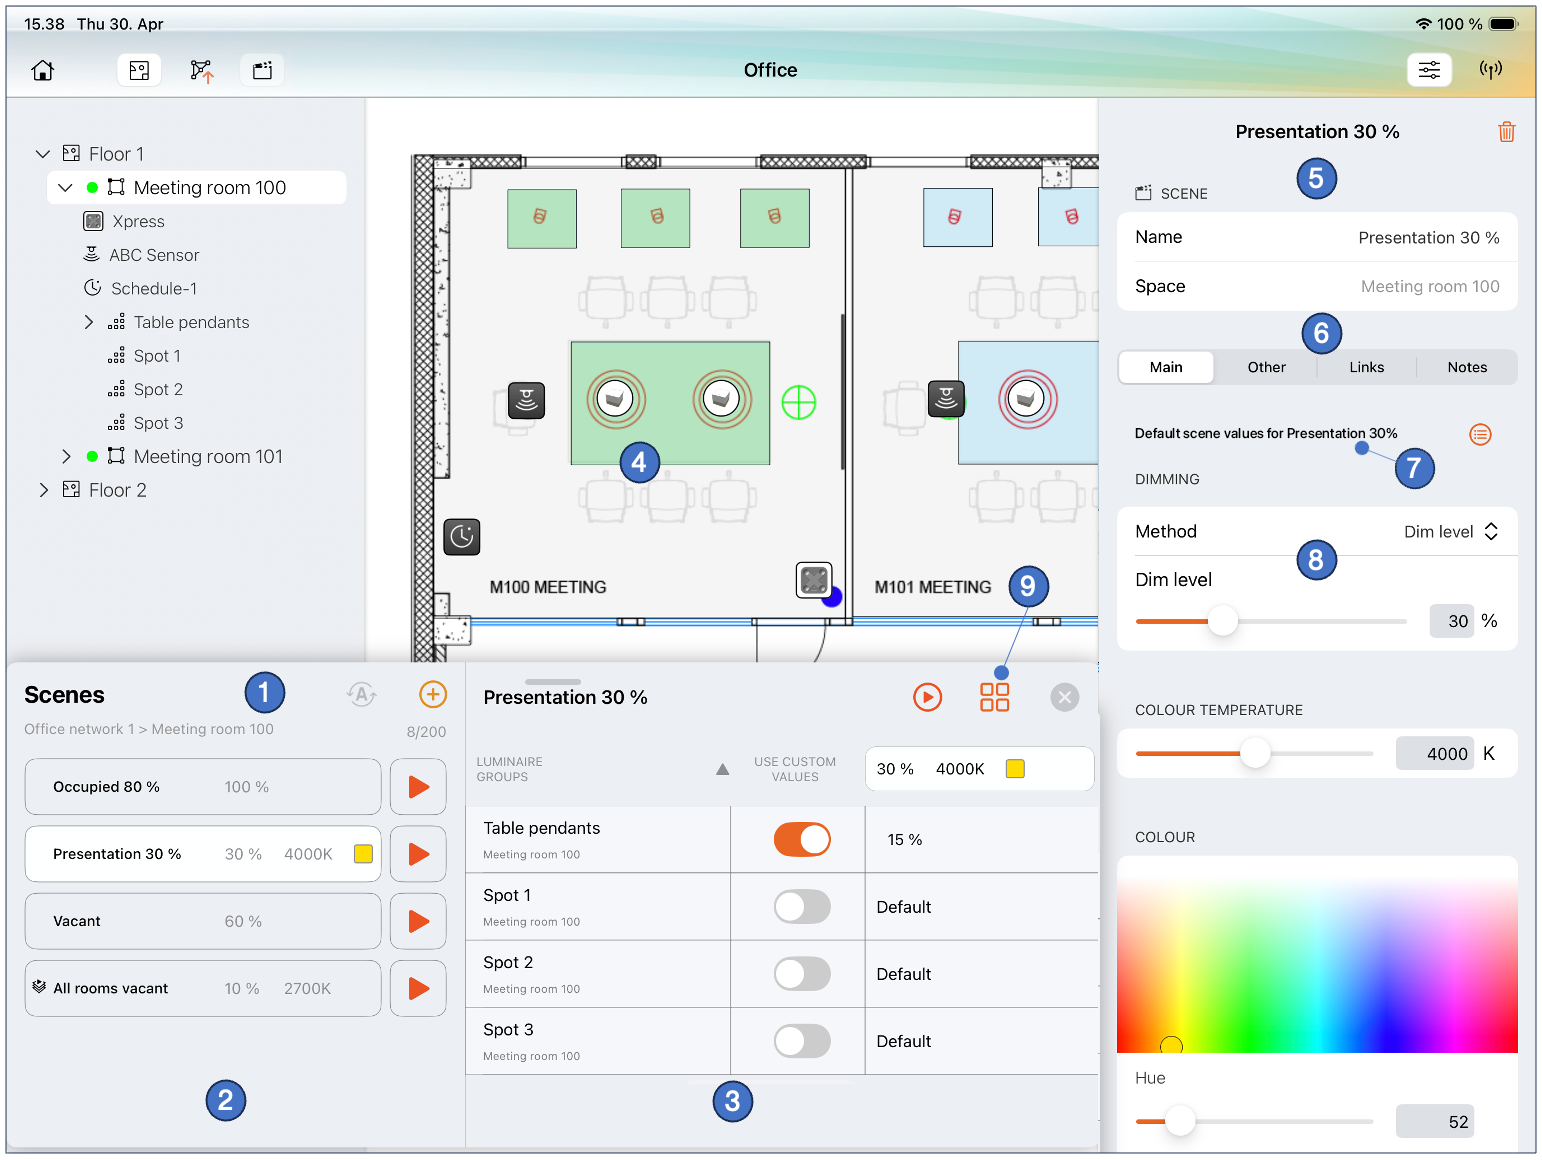
On iOS devices, the Scenes table has some additional features compared with the Casambi Pro for Windows. This is because on iOS there is a network connection to the physical devices, and scenes can be activated.
- Header & Capacity: The header displays the currently selected Network or Space. It also indicates the network's scene capacity (e.g.,
8/200); each network supports a maximum of 200 scenes.- iOS only: The Resume automation button. Resuming automation will disable any manually activated scenes and allow the luminaires to be controlled by sensors or timers.
- Scenes List (Left):
- Context: List contents depend on the selected network or space.
- If a space is selected, the list only displays scenes where at least one luminaire group from that space participates.
- If a network is selected, the list displays all scenes in that network.
- Selection: Click a scene name to select it from the list to see its details on the right.
- iOS only Play/Stop button for activating/deactivating a scene.
- Luminaire Group Table (Right):
- When a scene is selected, this table displays the participating luminaire groups and their specific configuration.
- The rows show participating luminaire groups, their parent spaces, and specific behaviour.
- Click a row to edit that group’s local behavior in the Properties pane.
- iOS only Play/Stop button at the top, for activating/deactivating a scene.
- Layout Identification: When a scene is selected, all participating luminaire groups are highlighted in green on the floor plan layout.
- Property Pane
- Header: displays the name of the scene selected from the Scenes pane, and the Delete scene button.
- If the entire scene is selected, the properties pane shows the default values for the entire scene.
- If a single luminaire group row is selected, the properties pane shows the used values for that group.
- Navigation Tabs: The Main, Other, Links, and Notes tabs display the parameters for the item selected in the Scenes table.
- Context Label: The text under the Main tab explicitly states the selection context (e.g., "Default values for scene") to prevent editing errors.
- Parameter Adjustment: Adjustable parameters such as dimming levels, color temperature, and RGB values are modified here.
- Group Management: Click the Select Groups button to add or remove luminaire groups to or from the currently focused scene.
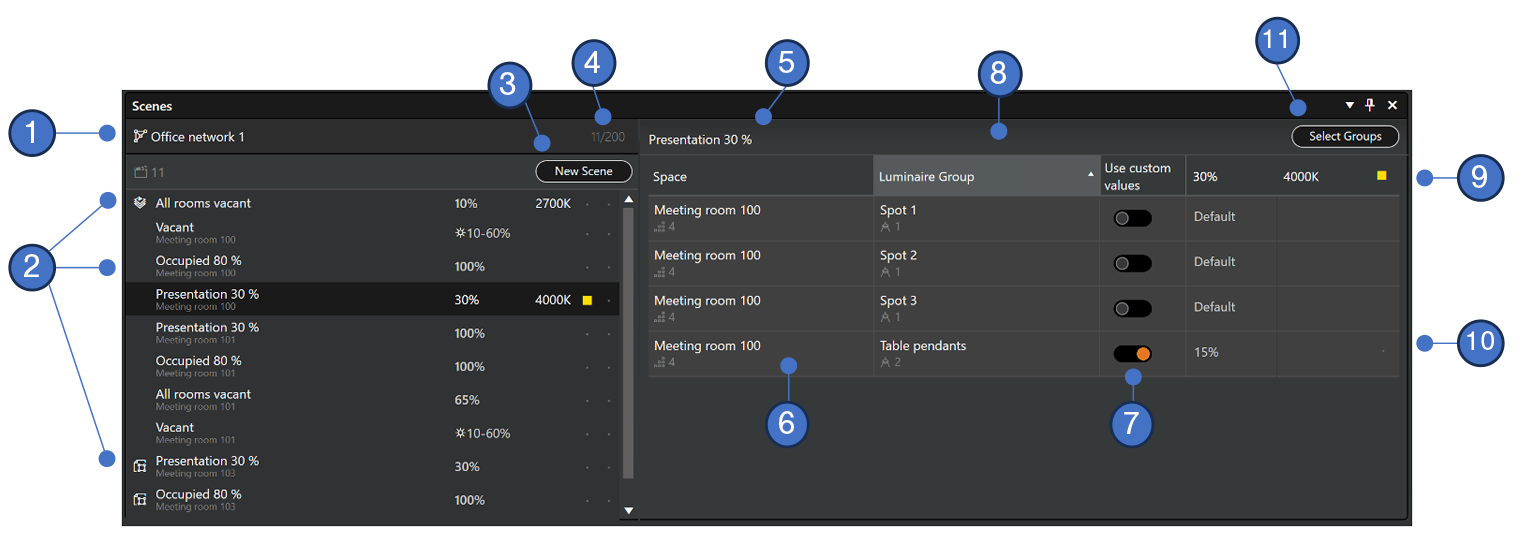
- The topmost cell in a scene column shows the default values set for the scene:
- Dimming level (mandatory). Dimming method can be selected from the property pane.
- Colour Temperature value in Kelvin. The colour temperature is an optional scene parameter that can be set in the properties pane.
- Other optional special parameters set in the properties pane are indicated with icons in the table. In the initial versions of Casambi Pro, the only special parameter is Up/Down light ratio setting. More will be added in future versions of Casambi Pro.
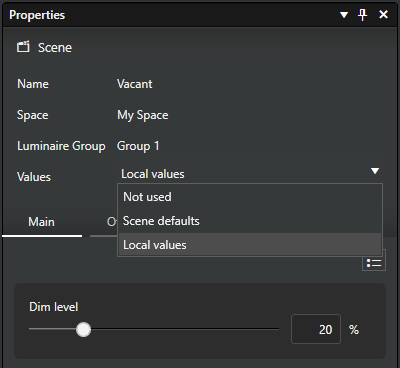
- By default, all groups in the space will participate in the scene with the scene’s default values. Each Luminaire group’s relation to the scene can be managed with these options in the properties pane:
- Scene defaults: Follow the default scene values for dimming, colour temperature etc., or
- Local values: Set customized values for the luminaire group, or
- Not used: Luminaire group does not react to the scene when the scene is activated.
- If the user has selected the “Local values” option for a certain group, the customized values are displayed in the group row. In this case, the local values override the scene’s default values when the scene is activated.
- If the user has selected the “Not used” option for a certain group, the group cell is displayed empty for that scene.
Scene properties
Dimming level is the only mandatory parameter for a scene in Casambi Pro. When needed, additional parameters can be activated in the Mains and Other tabs. In the initial Casambi Pro versions, there are three additional parameters: Colour Temperature, Colour and Up/Down light ratio. More parameters will be added in future releases.
Scene defaults
The default values of a scene will be inherited automatically by all luminaire groups in the same space.
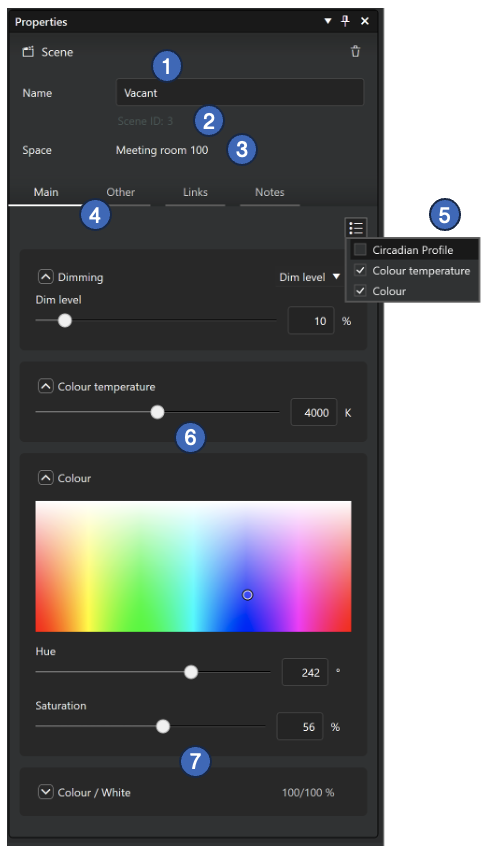
- Scene name (mandatory).
- Scene ID.
- Space where the scene belongs to.
- Tabs for scene options:
- Main
- Dimming level (mandatory)
- Colour temperature (optional)
- Colour (optional)
- Other
- All other optional scene parameters.
- Initially the Other tab contains only Up/Down light ratio setting.
- Links
- List of controllers which are linked to use this scene.
- Notes
- Area for adding free text notes.
- Main
- List for adding optional parameters to the scene.
- Each parameter can be adjusted either with a slider or by entering a numeric value directly to the text field.
- The Colour/White ratio setting is available only when both Colour Temperature and Colour parameters are used in the scene.
Group specific scene values
If user wants to customize scene values for a certain group instead of using the default scene settings, they can select a single cell in the Scenes table and set the custom values in the Properties pane.
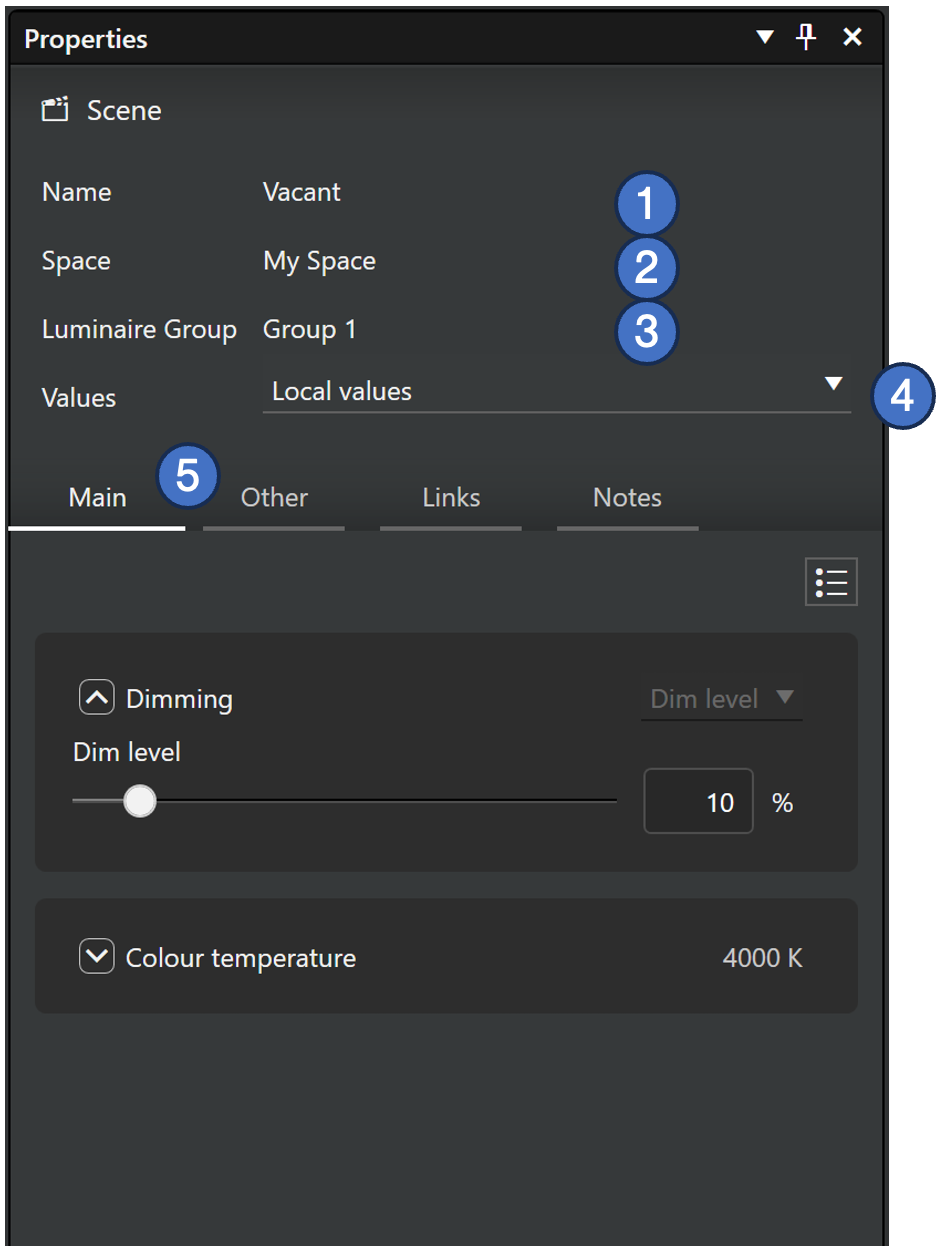
- Scene name. Not editable when a group cell is selected from the scenes table.
- Space where the scene belongs to.
- Luminaire group’s name.
- Values selection. Defines how this luminaire group reacts when the scene is activated:
- Scene defaults: The group follows the default scene values for the parameters. If this option is selected, the parameters are not editable.
- Local values: Use customized values for the luminaire group, instead of the scene defaults.
- Not used: Luminaire group does not react to the scene when the scene is activated.
- Tabs for scene options. These are the same as in the scene defaults case.
Scene table in Casambi Pro for iOS
The scenes are displayed as a table also in the iOS version of Casambi Pro.
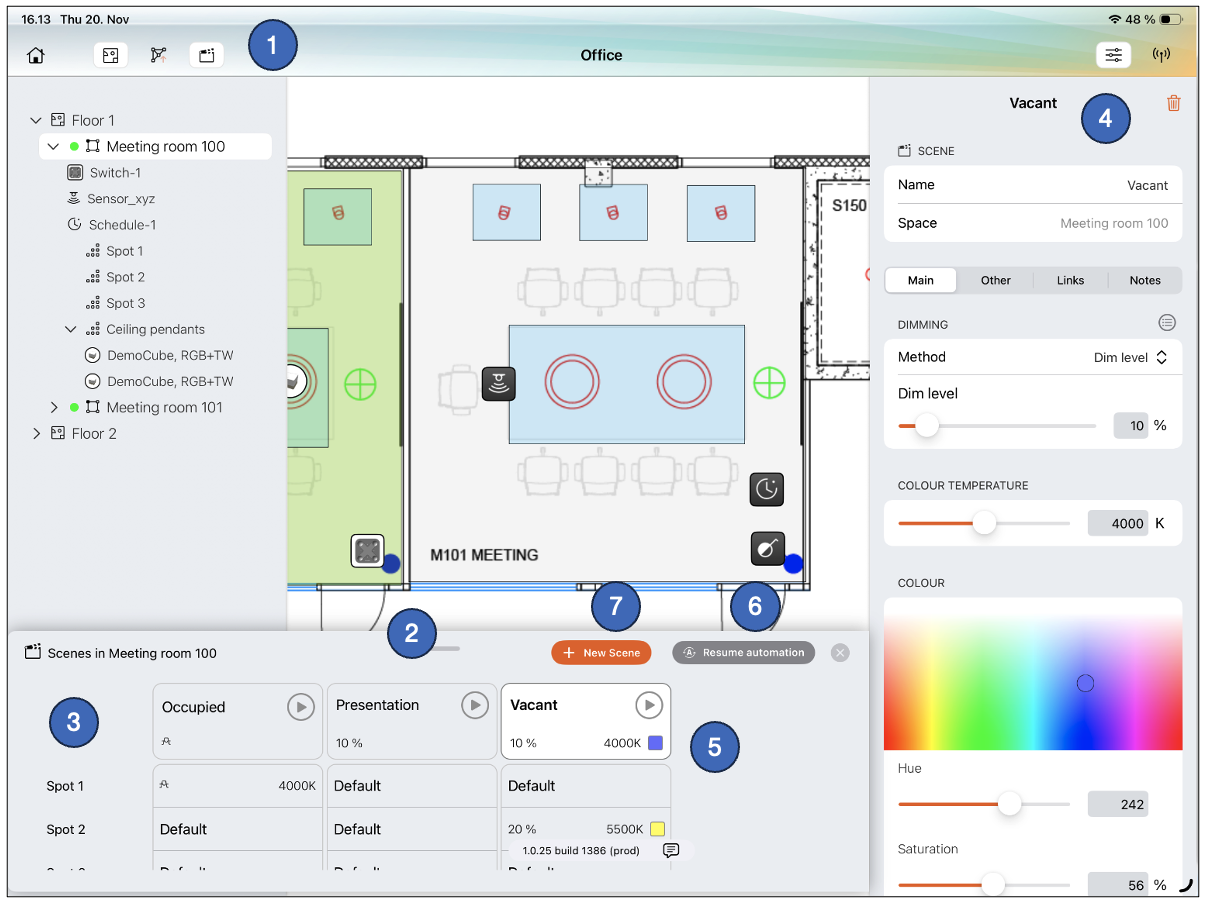
- The Scenes pane is opened/closed from the top toolbar.
- The pane can be resized by dragging the top part of the pane up and down.
- Structure of the scenes pane is same as in Pro for Windows.
- Each cell in the table can be selected to see their details in the properties pane.
- In Pro for iOS, it is possible to run scenes directly from the scenes pane by tapping the Play buttons. The buttons are disabled if there is no connection to the network.
- The Resume automation button can be used to remove the manual control from the network, e.g. when the scenes have been tested with the iPad.
- New scenes can be created with the New Scene button.
Deleting a scene
A scene can be deleted by selecting the scene column header cell in the Scenes table, and then tapping the delete button in scene properties (trash can icon).